Author Topic: Pixel Art Tutorial  (Read 3472 times)

0 Members and 1 Guest are viewing this topic.

Offline DinosaurNothlit

  • Pixellated Prehistoric Paradox
  • Gold Donor
  • *********
  • Posts: 14066
  • Karma: 521
  • Gender: Female
  • RAWR!
Re: Pixel Art Tutorial
« Reply #15 on: November 11, 2009, 01:44:46 AM »
Thanks for the karma!

Lol, I just noticed that I gave Ron bare feet.  I think I got so used to drawing Animorphs that I forgot that some people actually wear shoes.  ::)

Ah, well, we'll just say that Ron encountered some magical shoe-eating section of floor somewhere in Hogwarts.  Probably one of Fred or George's pranks.
« Last Edit: November 11, 2009, 01:47:19 AM by DinosaurNothlit »

Offline DinosaurNothlit

  • Pixellated Prehistoric Paradox
  • Gold Donor
  • *********
  • Posts: 14066
  • Karma: 521
  • Gender: Female
  • RAWR!
Re: Pixel Art Tutorial
« Reply #16 on: November 17, 2009, 04:47:08 PM »
Okay, I admit it, I lied.  I said that there would be only one more lesson.  But, as it turns out, I forgot to give Ron shoes, which at first seemed like a mistake on my part, but then I realized I could use my mistake to teach an extra lesson.  How to shade a patterned, or multi-colored object.  Trust me, class, this is something I really really wish I had known.  Particularly at about the time I was working on Jake's smiley for the Smiley project.  It would have made those stripes so much less frustrating.  Ah, well, you live and you learn.

Lesson 6: How to (Easily) Shade a Multi-Colored Object

Let's start by re-coloring Ron's feet.  To do so, we need to find two Pokemon, one for his sock color, and one for his shoe color.  I've picked Silcoon and Starly, respectively.

[spoiler][/spoiler]

Now, do you remember the method I taught earlier for quickly and easily changing the color of an object?  In case you don't, I'll recap.

Simply get out the eraser tool, right-click on the new color you want to change something to, left click on the old color you want to change it from, and hold down the right-mouse-button and drag the eraser over your picture until everything that was the old color is now the new color.

Using this method, I will switch the highlight color of Ron's feet with the color derived from our Starly (which is actually the shadow tone of Starly's lighter-colored lower body, but that's beside the point):

[spoiler][/spoiler]

And now the mid-tone:

[spoiler][/spoiler]

The shadow color:

[spoiler][/spoiler]

And finally, the outline color:

[spoiler][/spoiler]

And next, we copy and paste the image of Ron so that there are two of them.  Like so.

[spoiler][/spoiler]

Use the same method described above to turn the second Ron's feet white.

[spoiler][/spoiler]

Okay, now you're ready to begin the patterning.  Simply erase the areas in the first Ron's shoes that you wish to be white.  Use the pencil tool for this, and just select plain and pure white as your color to draw with, and that should serve to erase whatever you don't want.  Use the pencil to 'cut out' the pattern that you wish to appear in white, on the brown shoes.

When patterning an object, you can use either object as your 'base' and draw the pattern on the other; it doesn't matter which you use (unless one of them has any pure white as one of its colors, in which case cut holes in the other one, because any other colors will show through the white areas otherwise).  Just think of it as cutting holes in one sheet of construction paper, to be layered over another.  The other color will show up wherever you cut a hole.

Anyway, when we're done, we end up with this:

[spoiler][/spoiler]

Finally, select the first Ron with the select tool.  Make sure the 'clear background' option is highlighted (it's the second of the two pictures of colorful shapes, towards the bottom of the toolbar), and then drag the first Ron so he lines up perfectly with the second.  Always make sure you put the image that you've cut the patterns out of on top of the other one, or else the holes will get covered up and you'll just have a single-colored image.

[spoiler][/spoiler]

Ta-da!  That is the quickest way to shade an image that has multiple colors.  You can extend this technique to as many colors as you need.  Every time you want to add another color to your image, simply make a new layer, change its color, and cut the pattern out of it.

Our next lesson will be in animation.  I'll be showing the classic 'swish and flick' motion of the wand, as shown in the movies.  Goom, if you'd like, you are more than welcome to help me teach this lesson, and show the class how your side of the animation process works.  Which is something I'm also quite curious about, to be honest.

Then, after that lesson, because I just thought of another thing I haven't taught yet, I'm going to go into how I do morphing sequences, which will be a two-part lesson (outlining, then shading).  I've been meaning to draw a morphing sequence for James turning into a lion, anyway, so I'll just go ahead and turn him into an example.  Then I'm pretty sure we'll be done with this tutorial.  No promises, though.  I'll probably think of something else before then.
« Last Edit: December 10, 2009, 11:36:40 PM by goom »

Offline DinosaurNothlit

  • Pixellated Prehistoric Paradox
  • Gold Donor
  • *********
  • Posts: 14066
  • Karma: 521
  • Gender: Female
  • RAWR!
Re: Pixel Art Tutorial
« Reply #17 on: November 28, 2009, 04:38:29 AM »
Good day, class!  We have an exciting lesson today, so I hope you've all studied!

Lesson 7: Animation!

Today, we will be animating Ron's motion of the wand, with a 'swish and flick' motion.

The first step to animating anything is to remove the limb that you wish to animate.  In this case, that limb is Ron's arm.  It's amputation time!

To do this, simply block off a piece of Ron that happens to contain his arm in it, and copy and paste.

[spoiler][/spoiler]

Then, erase the extra stuff surrounding his arm, so that all that's left is the arm.  Be careful not to erase too much!

[spoiler][/spoiler]

Now, before doing this next step, 'take a picture' of Ron as he is now.  In other words, copy and paste him somewhere onto your work area.  You'll need him later, for reference.

Okay, done?  Because now we are going to erase Ron's arm.

[spoiler][/spoiler]

Now, re-draw the part of Ron's torso that is missing:

[spoiler][/spoiler]

Okay, now we're ready for the tricky part.

First off, a note.  I have divided all these 'Rons' into different sheets, simply for the sake of showing you my process.  When I'm actually working on a picture, I tend to just copy/paste every step of the way, so that all my work is right there, where I can easily access it.  This is what I recommend.  Never make a change without making a copy first!

That said, let us begin.

Animation is all about changing angles by tiny increments.  You all remember the lesson on angles, right?  An angle is simply a number of pixels per block.

To change angles, what I usually do is select a bit of a picture, and move it a tiny bit at a time in the direction I want it to go.

[spoiler][/spoiler]

When picking a block to move, it's usually easiest to try and divide it between pixel-blocks, so that when you move the piece that you're moving, you wind up with a straight line.  It's just personal preference, though, because that method just happens to make all the shadows and highlights line up neatly.

[spoiler][/spoiler]

See?

Doing the same thing again, we then get this:

[spoiler][/spoiler]

Think of it a little like film.  Or if any of you have ever done stop-motion animation, it's a lot like that, too.  Each image captures a little bit of motion, so you have to move whatever it is you're moving just a little bit with each image.  Don't worry about saving too many images, because you can always throw them out later (and, in fact, that's exactly what I'll be doing at the end of this lesson).

Another thing to think about, is that a lot of times, when you change an image like this, you have to go back and edit by hand.  Don't worry, you don't have to re-draw the same arm fifteen times.  Just smooth out any lines that look rough after moving anything around (this is where the 'changing angles' part comes in; just keep in mind that fixed numbers equal straight lines, and counting numbers equal curves), and re-shade anything that gets its shading messed up.

In this case, it looks like his sleeve is too big.  So we'll make it a bit smaller before changing the angles some more.

[spoiler][/spoiler]

Then we shift the hand a little bit . . .

[spoiler][/spoiler]

Then we re-draw it a bit, to eliminate that little bump that looks like a thumb (thumbs are fine, of course, but if we have one in only one frame, then it will seem to appear and then disappear, which is not what we want).

[spoiler][/spoiler]

Then we adjust the arm a bit more by moving another 'block' . . .

[spoiler][/spoiler]

Then we move another 'block' and re-draw the sleeve.

[spoiler][/spoiler]

Move another block:

[spoiler][/spoiler]

Now, move another block, re-draw the sleeve a bit so that it hangs down like it did before, and change the angle of the hand.  I changed the angle of the wand, too, from 1-pixel blocks to 2-pixel blocks.

[spoiler][/spoiler]

Okay, now we've done the basic motion of the 'swish,' now for the 'flick.'

Just re-shape the hand from the first arm that Ron started with, and there you go.  The flick only needs to be one frame, after all.

[spoiler][/spoiler]

Okay, so assuming you've now got everything saved on the same page like I told you, your page should look like this:

[spoiler][/spoiler]

We've got one armless Ron, a whole bunch of arms, and the original picture of Ron that I told you to keep for reference.  I think that you don't need to see everything large-sized at this point, since most of the major work is done.

Now, we can eliminate a few of the extraneous arms.  We only need the ones that we can see a noticeable difference between.  All the others will just make the animation look slow and messy.

[spoiler][/spoiler]

Okay, next draw a box around your armless Ron.  Doesn't matter what size, but I like to leave exactly one pixel of white space under his feet (personal preference), and you need to leave enough room in front of him for his arm.

[spoiler][/spoiler]

Then, copy-paste your armless-Ron-in-a-box, as many times as you have arms.

[spoiler][/spoiler]

Then, using your original Ron as a reference, re-attach your Rons' arms.  Be sure you get the arm in the same spot in each frame, or else you will have shoulders that jump all around.

[spoiler][/spoiler]

You're almost done!  If you're lazy, you could probably consider yourself done.  Trust me, I was tempted to.

But, as we have it now, Ron is only moving his arm up and down before flicking his wrist.  What we want is more of a circular motion.  To move something forward and back (into and out of the screen), simply change the shading.

[spoiler][/spoiler]

The top row shown here is Ron moving his arm out of the screen, the second row is him moving his arm away from the screen.  All I've changed is the shading.

When he moves his arm into the screen, the light shines more brightly on his forearm, because the light source is in front of him, and thus the angle of his arm catches more light.  When he moves his arm out of the screen, the shadows are stronger, since his arm is now blocking the light.

So, to show his arm catching more light, simply extend the highlighted areas.  And to show his arm blocking light, extend the shadowed area.

Here's an example, to show what I mean:

[spoiler][/spoiler]

The first arm is coming out of the screen, and is thus angled to block light, and therefore the shadowed space is bigger.

The second arm is angled into the screen, and is thus angled to catch light, and therefore the highlighted space is bigger.

Then, once you've got all of your motion frames, you can begin to separate them.  Save your sheet as a new name, and then change the size of your page (using the knob in the bottom right corner).  Move your box up into the top left corner until the black edge of the box is just covered by the edge of the page.  Then re-size the page until the rest of the black edge disappears, and no more.  This will give you a consistently-sized page for each frame.

Then save it, and re-open the page you had before, and repeat until you have a page for each frame.

Note:  I always make sure to save a backup copy of the page I'm working on, because otherwise I might forget to re-name it before I change the size, and then all my work is gone.  :(  So yeah.  Always save backups!

When you're done, you will have this:

[spoiler]

[/spoiler]

Et cetera.

Just to make things easier on Goom's end, I've recently begun making new folders for each animation sequence, and putting the frames in there.

And once I've done that, I take my folder and right click it, and click "Send to" then "zipped (compressed) file."  Then I upload that zipped file onto our RAFsmiley picture drop site, and then Goom takes it from there.  Goom?  Would you like to take over the class for a bit?

[spoiler=For Goom]I've uploaded the frames to the drop site for you.  The sequence should go 1-2-3-4-5-8-7-6-1-9, with a 1200ms pause on the first frame 1, and a 400ms pause on the second frame 1, and looped.  Let's run the 'swish' a little faster than usual, and let's make frames 2, 3, 4, 6, 7, and 8 go at 70ms instead of the standard 100ms.[/spoiler]
« Last Edit: December 10, 2009, 11:38:56 PM by goom »

Offline goom

  • the underling of underlings
  • Administrator
  • *****
  • Posts: 8927
  • Karma: 690
  • Gender: Male
  • no other distinguishing characteristics.
    • Twitch.TV Streams
Re: Pixel Art Tutorial
« Reply #18 on: November 28, 2009, 05:29:54 AM »
your wish is my command.
here's ron.

and an animated tutorial.. (let me know if it's too fast.)
« Last Edit: November 28, 2009, 09:22:43 PM by goom »

Offline DinosaurNothlit

  • Pixellated Prehistoric Paradox
  • Gold Donor
  • *********
  • Posts: 14066
  • Karma: 521
  • Gender: Female
  • RAWR!
Re: Pixel Art Tutorial
« Reply #19 on: November 28, 2009, 09:56:53 PM »
The animated tutorial is great!  One thing, though.  You should probably slow down the frames that have more text, and speed up the ones with less.

What's the frame-rate you're using?

Offline goom

  • the underling of underlings
  • Administrator
  • *****
  • Posts: 8927
  • Karma: 690
  • Gender: Male
  • no other distinguishing characteristics.
    • Twitch.TV Streams
Re: Pixel Art Tutorial
« Reply #20 on: November 28, 2009, 10:08:38 PM »
The animated tutorial is great!  One thing, though.  You should probably slow down the frames that have more text, and speed up the ones with less.

that's what i tried to do.

open the file in gimp and you can see for yourself. ;)

Offline DinosaurNothlit

  • Pixellated Prehistoric Paradox
  • Gold Donor
  • *********
  • Posts: 14066
  • Karma: 521
  • Gender: Female
  • RAWR!
Re: Pixel Art Tutorial
« Reply #21 on: December 10, 2009, 03:30:33 PM »
Okay, class, I'm sure this is the lesson you've all been waiting for!

Lesson 8: Morphing (part 1)

Today we will be learning how to draw the outline of a morphing sequence.  I've been meaning to make a James sprite anyway (remember James, of the Auxilary Animorphs?  No?  Oh, well, he morphs a lion, and that's all you need to know), so I figured I may as well make a lesson out of him!

First, draw your human outline.  You should already know how to do this, so I'll skip the details.

[spoiler][/spoiler]

Next, draw a lion.  I usually start with the head.

[spoiler][/spoiler]

Most animals have a more protruding face than a human, so don't use the flat line that you would use for a human face.  Of course, all animals are different, but most have a sloped forehead and a protruding muzzle of a variable shape/length.  Just play with shapes until you find one that looks right.  And feline heads are the hardest of all.  I have to admit that even this one doesn't look all that catlike to me, and this was the best I could do.  So, uh, don't follow my example on this one.  Go look at a cat!

Anyway, next, draw the body.

[spoiler][/spoiler]

You can get a pretty good idea how to draw most animals' limbs just by looking at your own arms and legs.  Almost all earth vertebrates have the same basic joints.  Cat front legs bend the same way as your elbows.  And the hind legs are just like yours, except with the knee and ankle joints moved up a bit towards the hips.

Note: certain hooved animals, like horses, have 'elbows' that bend backwards compared to yours.  Watch out for that, I've gotten tripped up by those.  Stupid horses.

And the tail, of course, is just two gently curving lines with a little bit of space in between.  Some animals have tails that narrow to a point (such as lizards, kangaroos, and Andalites), so simply diminish the amount of space between the lines as you get closer to the tip.  Cats don't have this issue, since their tails are about the same thickness all along their length.

Okay, so this guy doesn't exactly look like a lion yet?  Easily fixed.

[spoiler][/spoiler]

Ta-da!  Added a mane, and that little tuft at the end of the tail.

Okay, so now we have a lion and a human.  Next step is to put a box around them.  Start with the lion, because he's the bigger one, so he's the one we have to allow the most room for.  Be sure to allow room all around him, for any additional moving around he might end up doing.  Always be sure to allow room for him to stand up, because he may actually end up at his tallest in mid-morph, when he's standing up like a human, but still as big as a lion.  Rachel did this when she was turning into a grizzly bear, and nearly broke out of her frame.

[spoiler][/spoiler]

Then, copy-paste and erase the lion, so that you have a second box.  Make sure you've marked where the back of the lion's hind foot was in the box, so that you can line that spot up with the back of the human's hind foot.  This is so he doesn't jump around the frame while he's morphing.

[spoiler][/spoiler]

Okay, now we start in with the fun stuff.  The actual morphing sequence.

I want to note that, when I first started doing these, I would take the 'mid-point' of two forms, and drawing a half-way form, and then a half-way form of that and the end form, and so on.  DO NOT DO THAT.  It takes much much longer, and the end result is rough and terrible-looking.  I will show you what to do instead.

Choose one of your forms to work from.  I usually choose the more complex form, since it's easier to simplify than to complexify.  So I'm going to work from James's lion form.

Copy and paste the form you're working from:

[spoiler][/spoiler]

Here's were it gets tricky.  Take note of everything that has to change during your morph sequence.

In this example, since he's going from quadruped to biped, the torso changes angle.  The limbs get thinner and change angle slightly, and the shoulder shifts position.  The tail must disappear.  The face must shrink.  And the mane shrinks such that it leaves behind only the hair on the head.  Alter your lion image to take each of these changes into account, just slightly.

[spoiler][/spoiler]

You remember how to change features of your picture, right?  Just select the part that needs to be moved around, move it just a little bit, and fix any lines that get messed up in the process.  Refer to the lesson in animation to brush up on this concept.

Although mid-morphs do tend to look a little ugly (which, of course, is not only okay, but is even canon), keep in mind that the angles and curves still need to look good.  Anything that bends the wrong way, or has a jagged edge where it shouldn't, will stand out in the finished animation.

Just keep counting pixels for those curves, and keep angles constant (well, mostly.  Sometimes you can get away with cheating a bit, but ultimately you have to be the judge of your own work.  Every case is different).

Anyway, next step is to copy and paste the new frame you just drew.

[spoiler][/spoiler]

Then, you just do the same thing again.  Note every detail that needs to change, and gradually work your way there by changing each thing a bit at a time.  I'm afraid I can't really give much in the way of catch-all advice, since every morph is so different.  Just make sure you take note of how each thing changes.

[spoiler][/spoiler]

And I find it fun, because I get to choose how the morph goes.  If you have a morph that grows extra heads, for example, it's up to you whether the extra heads 'split off' from a central head, or whether they emerge as growths on the neck.

For example, in the case of James, I'm choosing to morph his mane into his hair.  I could just as easily have made his mane retract, and then had his hair grow back.  Such are the sorts of decisions you can make.

[spoiler][/spoiler]

Now that he's standing in a nearly human pose, I'm going to start moving the arm back a bit, because I noticed that it's much farther forward on the lion than on the human.

[spoiler][/spoiler]

I typically use nine frames, which was originally because of my silly 'mid-point-method' that I used to use, but as it turns out, nine frames is a good number to go from just about any form to any other.  I'm mentioning this simply because you should always keep that number in mind.  Nine frames to go from one frame to another, so seven frames of mid-morph.  Or however many frames you want to use.  Just keep in mind, so you don't end up changing a frame too much or too little at a time.

[spoiler][/spoiler]

Of course, you can always go back once you've got the sequence done, and fix things up to correct for those 'timing' errors.  I just prefer not to, if I can help it.  I have enough experience under my belt that I can estimate pretty well just how much I have to change each feature, but sometimes I have some trial and error, and that's fine too.

[spoiler][/spoiler]

At this point in the sequence, as you're getting closer and closer to human, it's very important to keep your human frame handy for comparison.  Make sure everything lines up, and that nothing reverses direction.  If his arm moved up in the previous frame, make sure it doesn't go back down again from this frame to his human frame.  Everything needs to be smooth.  Direction reversals look terrible in the animation.

[spoiler][/spoiler]

And there we go!  That's the last mid-morph frame.

Next lesson will be shading a morphing sequence, which is a little different from shading a normal object, because you have to shade the seven mid-morph frames twice and blend them together.  But we'll cover that later.

As extra credit, can anyone tell me at least five features that change in Tobias's morph?

:tobias:
« Last Edit: December 10, 2009, 11:41:05 PM by goom »

Offline DinosaurNothlit

  • Pixellated Prehistoric Paradox
  • Gold Donor
  • *********
  • Posts: 14066
  • Karma: 521
  • Gender: Female
  • RAWR!
Re: Pixel Art Tutorial
« Reply #22 on: December 14, 2009, 12:27:06 AM »
Lesson 9: Morphing (part 2)

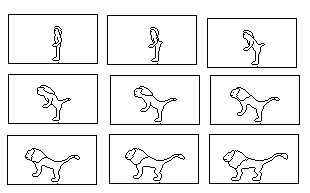
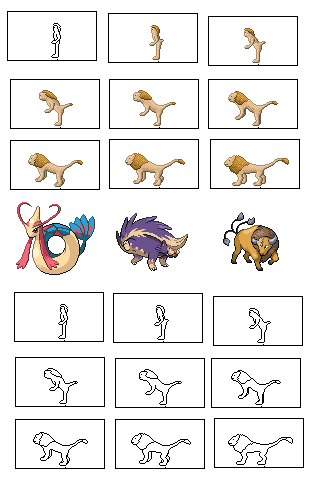
We'll start off with the frames we made in the last lesson.  I've actually made just a few changes here, since I realized that the ankle was a little too low, and the tail emerges too suddenly from the human frame.  Which helps me make an important point, actually.  When you do go back and edit your morphing sequence frame-by-frame, you must also edit any surrounding frames, so that nothing reverses direction or changes too suddenly.

[spoiler][/spoiler]

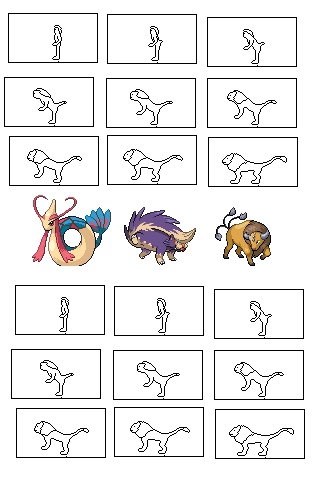
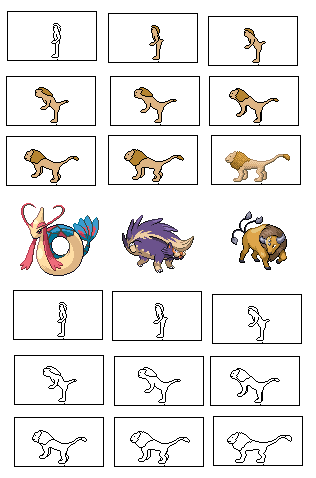
Copy and paste the sequence, because you will need to shade it twice.  Once, with the lion's color scheme, and once, with the human's color scheme.

I'm going to start off the shading with the lion half of the sequence (no particular reason, I just happen to like lions better than humans :D).

[spoiler][/spoiler]

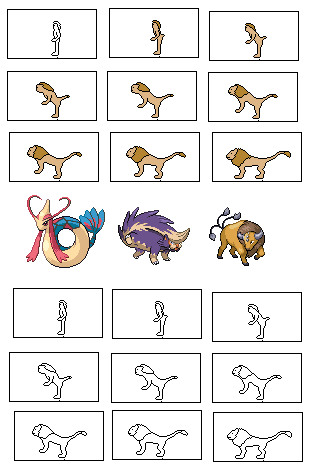
I chose Skuntank (the one that looks like a skunk) for the lion's body color, but it didn't go light enough, so I took my highlight color from Milotic (the snake-mermaid thing).  For the mane, I used Tauros.

Then, just use the bucket fill to color in the outlines, just like how we started off when we were shading Ron.  Don't worry about the fully human frame, since you obviously don't need to shade him with the lion color scheme.  All seven midmorph frames have to be shaded twice, but we'll get to that a little later.

[spoiler][/spoiler]

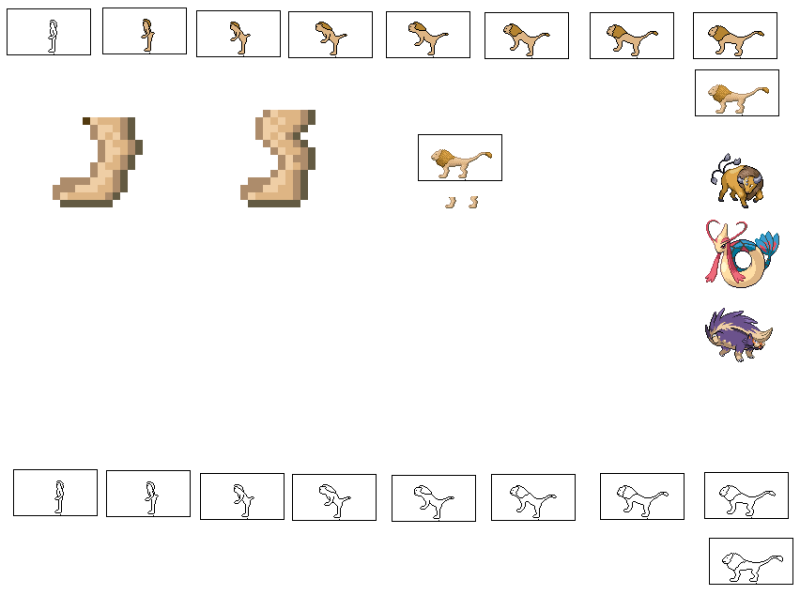
Now, you should know how to shade things at this point, but I'll enlarge the lion frame to show you how I shaded him.  I added a little 'roughness' to his mane by putting highlight in some areas but not others, and putting extra pixels of highlight and shadow here and there in their respective areas.  I'll cover fur textures more in-depth in my next lesson, which will cover specific textures.

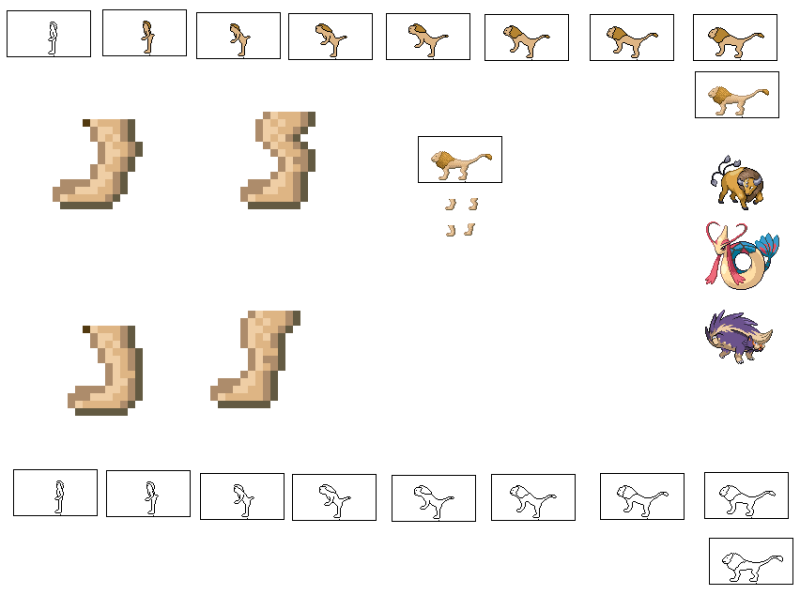
You may have noticed that this lion only has two legs.  We will fix this now.

First, select and copy each of the lion's legs.

[spoiler][/spoiler]

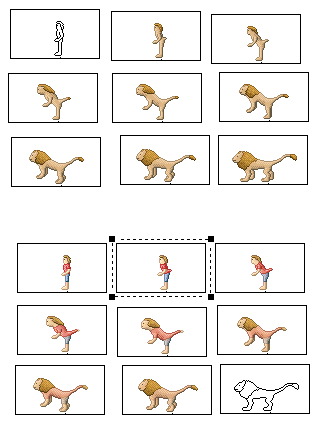
Then, by selecting and moving the feet around, you can change the angle of the legs backward or forward.  This is so that the 'back' legs won't look like carbon copies of the 'front' legs.  It's generally advised, if you move a leg so that it's angled forward, you have it sticking out in front of the other leg, and the same if you angle it backwards.  Usually I try to angle both 'back' legs the same way, because it tends to look more symmetrical, but sometimes you can have poses where they're angled towards each other.

Here, I've angled the front and back legs towards each other, but I will later find that this doesn't look good, and change my mind.  But, for reference, the bottom two legs shown are the altered ones, and the top two are the unaltered ones.

[spoiler][/spoiler]

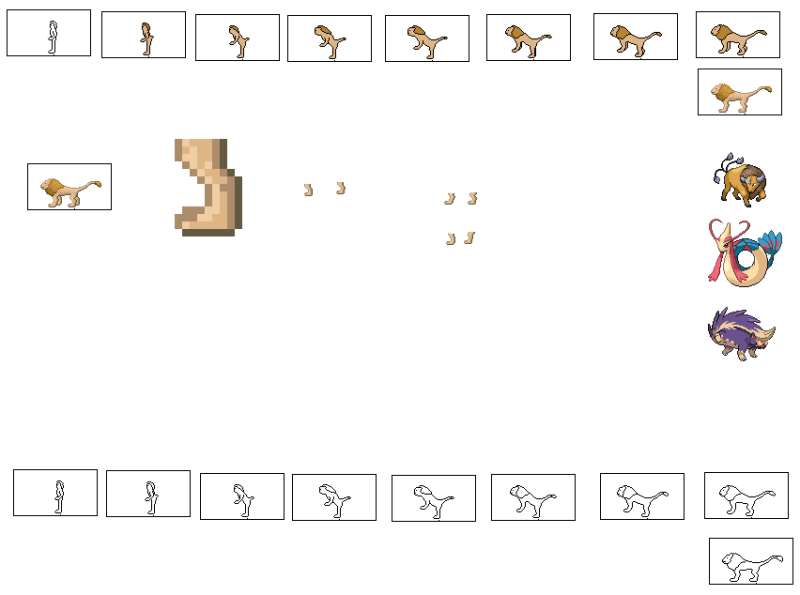
Then, drag your two-legged lion frame over one of his legs, so that he looks like he has three legs now.  Move your picture around until the legs look like they're aligned more-or-less naturally.

[spoiler][/spoiler]

Do the same thing for his remaining leg.

[spoiler][/spoiler]

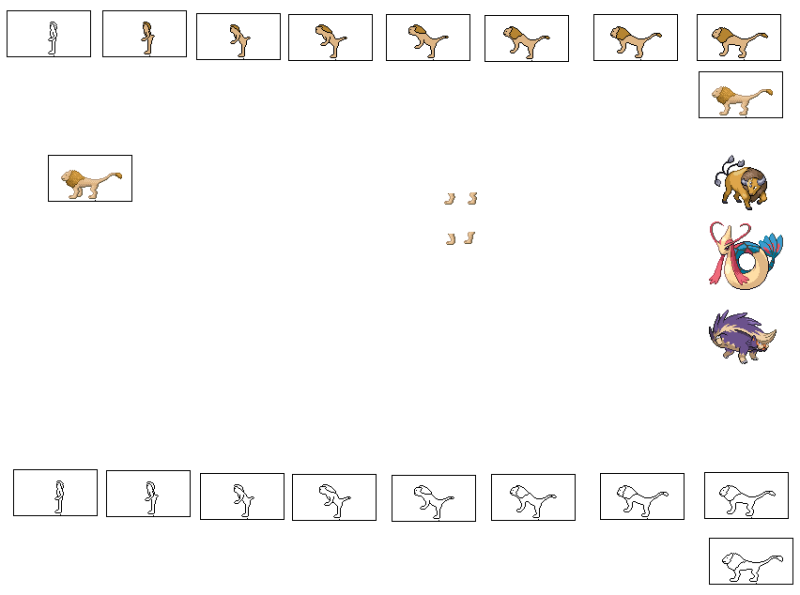
Now, do the same thing with a few of the mid-morph frames.  With the mid-morphs, you want to gradually 'hide' the extra legs behind the body, because the human doesn't have them, so they have to go somewhere, right?  So, with each successively more-human frame, there should be less and less of the extra legs showing, until they disappear entirely.

Note: be sure to do this step BEFORE you shade any of the mid-morph frames, or you will soon end up having to do some very annoying back-tracking.

[spoiler][/spoiler]

Then, copy and paste any frames you've altered, and use the fill tool to make them white again, then replace the corresponding frames in the bottom sequence (which is going to become the human-shaded sequence) with the four-legged frames.

[spoiler][/spoiler]

Now we shade the lion sequence.  Cue time-lapse photography!

[spoiler][/spoiler]

Note: there should be some point, if an object changes angle, where the lighting changes.  Don't try to slowly decrease the highlight and shadow prior to the change.  Just pick a point where front-lighting over-rides top-lighting, and switch the highlight and shadow.  Do you see the frame in this sequence where that happens?  Take note of that frame, because you should shade your other sequence the same way.  It isn't going to look pretty if the highlight of one frame conflicts with the shaded area of the other, so make sure they match.

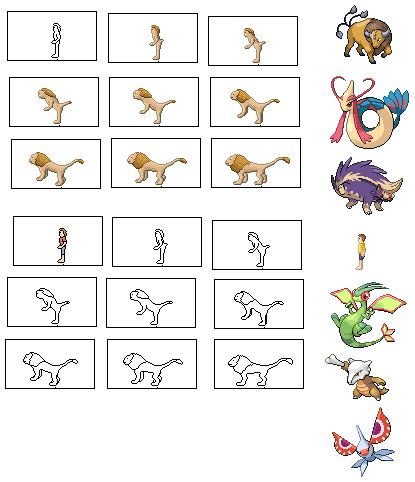
Now, it's time to shade the other side of the transformation.  First, as always, we pick our colors.

[spoiler][/spoiler]

Yes, yes, I know, Jake isn't a pokemon.  But I've been using the same skin tone for all the (caucasian) Animorphs so far, and I don't remember which pokemon I used, so I've just been using Jake as a reference.  Flygon supplied the red for the shirt, Marowak the brown for the hair, and Masquerain the blue for the pants.

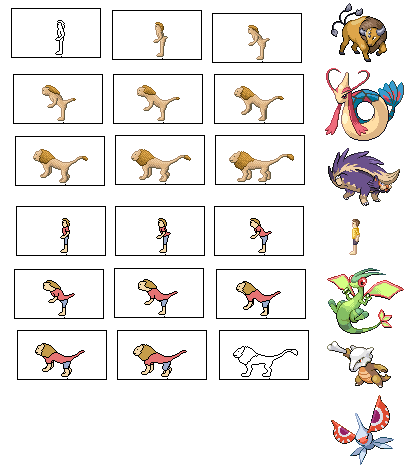
So, first, we draw a few lines for the morphing suit.  Morphing suits are nice, that way; we don't have to worry about anything fitting like normal clothes should, since it's all skin-tight.

Anyway, you want to make sure that the lines of the morphing suit line up.  You don't want sleeves that jump up and down from frame to frame, unless the arm is moving with it.  Same with the pant leg, and the bottom of the shirt.

[spoiler][/spoiler]

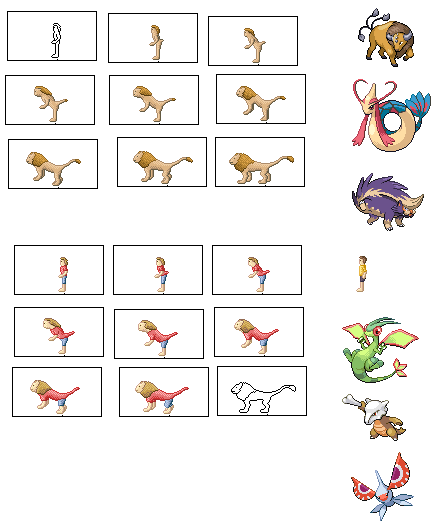
You may have noticed that I deleted the brush at the end of his tail for the human-colored sequence.  This is because it is a feature that is completely lacking in a human, so how would you decide what color to color it?

I've done the same thing for Ax's tail blade when I was shading his human-color sequence, and for nearly every morphing figure's hair on their animal side, since most animals don't have hair.  In fact, James was the first morph that kept his hair through the transformation.

Don't fret, I always add those features back in again later, and I will show you how to do it when the time comes.

Then shade it just like you did the lion colored sequence, and there you go!  Fast-forwarded once again, of course.

[spoiler][/spoiler]

If you're lazy, I suppose you could just copy/paste, and change the colors using the method I've mentioned several times before.  But I never do this.  Why?  Because I like to have fun with textures, and I usually make the textures different from one form to the other.  For instance, in the case of James's human color sequence, his red shirt ended up being too shiny if I gave it a solid line of highlight, so I broke it up into cross-hatched pixels.  Also, I worry about the highlight being too strong if it overlaps completely, but, like I said, I've never actually tried it that way, so I might be wrong.

I made one last last-minute change, to fix the mane.  Which brings me to another point.  If you're still making changes after you've shaded everything (which I often do, since I'm such a perfectionist), make sure that you make any changes to both sequences, the lion-shaded one, and the human-shaded one.  If their silhouettes don't match exactly, then the next step won't work.

[spoiler][/spoiler]

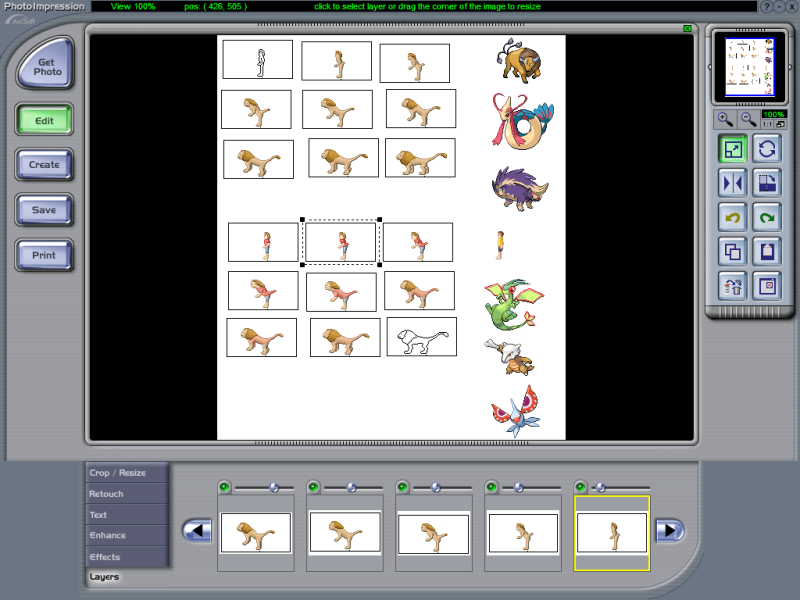
There.  Now it's time to change gears a bit.  We will now be leaving the familiar territory of ms paint, and entering Photoshop.  In my case, Photoimpression 4.  But any program that allows you to create layers and alter transparency will work just fine.

[spoiler][/spoiler]

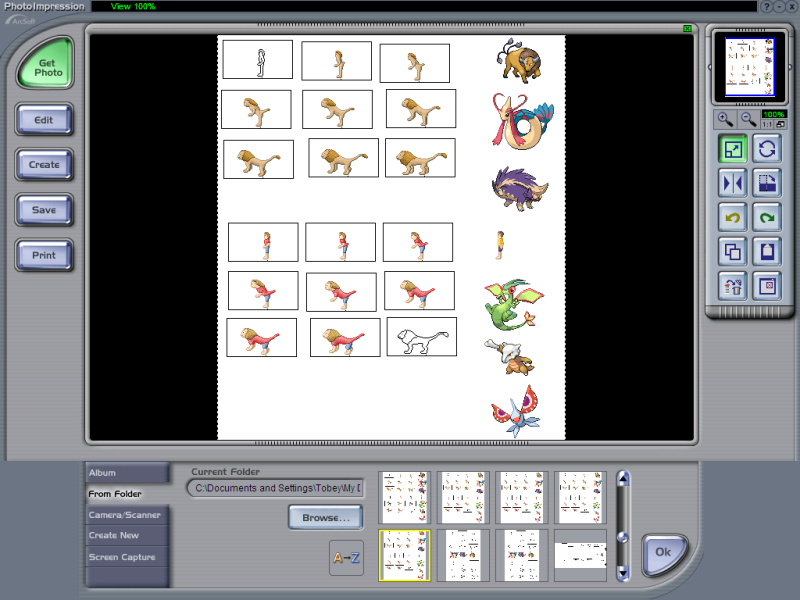
Upload your picture.  Then, go to Crop/Resize and use your mouse to crop out one frame, and make it into a new layer.  Do this seven times (one for each mid-morph frame, since you don't need to worry about the fully human or fully lion frames), and you will have this:

[spoiler][/spoiler]

You'll notice that I chose to copy the lion-colored frames rather than the human-colored ones.  There is a reason for this choice, and it is on the tip of his tail.  We'll need to keep the full-colored lion sequence, so that we can re-gain the color of the tail tuft.

If you accidently copied the wrong sequence (or, if both forms have a feature that disappears), then simply refer back to a previous draft of your work.  You've been saving copies of everything, like I've told you to, right?

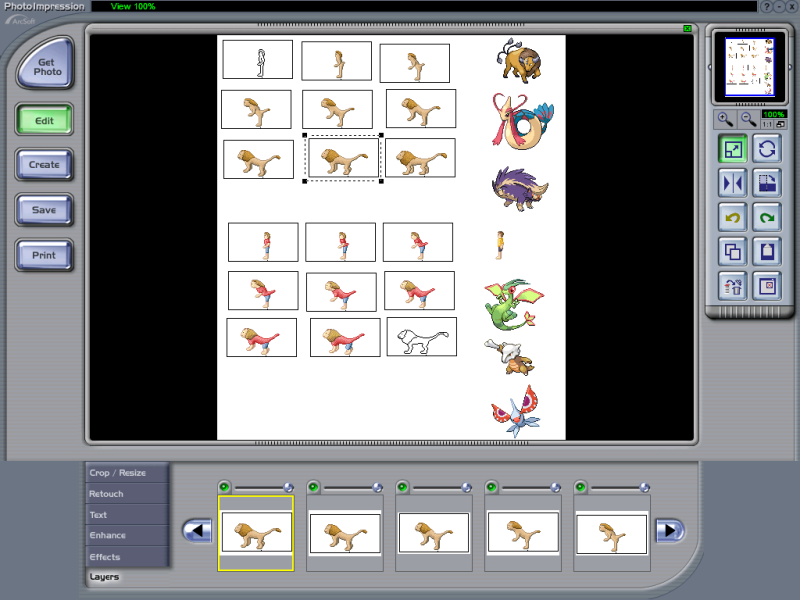
Now, to line the layers up, put one of your frame-layers to half transparency, and line it up with its corresponding layer in the other sequence.

[spoiler][/spoiler]

If the outline looks blurred like that seen above, then it isn't lined up right.

[spoiler][/spoiler]

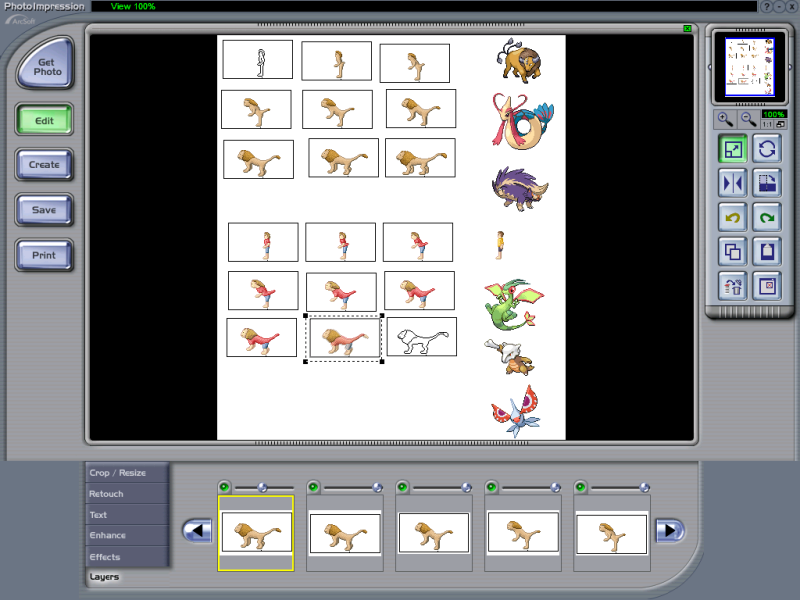
There you go!  A nice, clean, black outline is what you're looking for.

Next, move the slide-bar to about 7/8ths of the bar.  Accuracy isn't incredibly important here, but just make sure that each frame is successively more transparent than the previous one.

[spoiler][/spoiler]

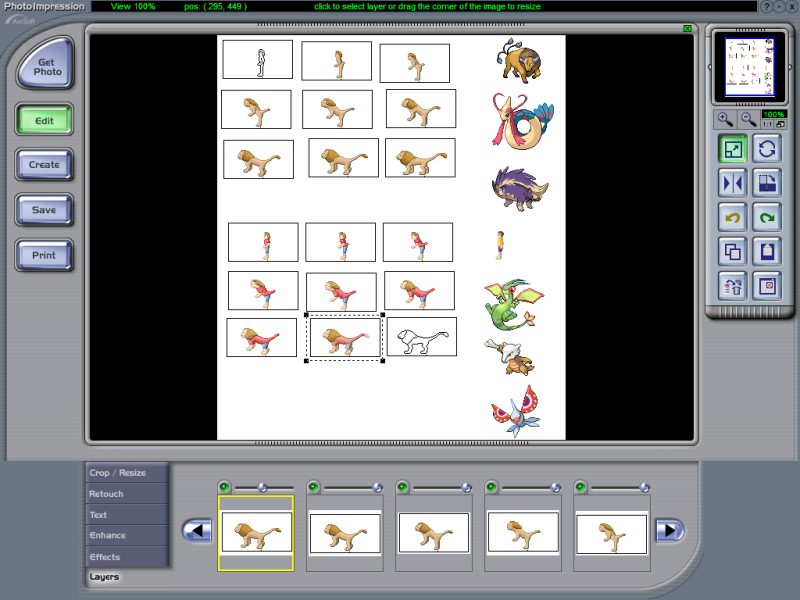
Then, just do that with each frame, making the transparency for each one 7/8ths, 3/4ths, 5/8ths, 1/2, 3/8ths, 1/4th, and 1/8th, in that order.  Again, don't worry too much about getting it spot-on, just sorta guesstimate.  If you know about where 1/4 is and where 1/2 is, you'll be fine.

[spoiler][/spoiler]

Next, take a screen-shot.  You technically could save the photoshopped pic, and compress all the layers and whatnot, but taking a screen-shot of it is way easier.  Just hold Ctrl and press Prt Scrn.  Then paste the image (which should now be in your clipboard) back into paint, and just erase whatever you don't need.  You should end up with this:

[spoiler][/spoiler]

Remember what I said about needing to fix up the tail tuft?  Look at how it fades out as the color scheme goes from lion to human.  Now, we want it to slowly shrink and disappear, not vaporize into the air.  So here's what we do.  Simply copy, from the lion-color sequence, the parts of the tail that our old human-color sequence was missing.

[spoiler][/spoiler]

Now, drag those pieces over their faded-out counterparts.

[spoiler][/spoiler]

Ta-da!  All done.

The next lesson probably will be our last.  I know, you've heard that before, but now that I've taught morphing I'm honestly running out of things to teach.  The only things that I still know that you don't, are simply a few random textures.  Fur, feathers, grass, wood, glass, etc.  Besides, ten is a nice round number.  :)

Until next time, class!  Study hard!